One of the neat things about an insulin pump is how you can choose how and when the insulin is delivered based on what you are eating, what you are doing, and if you are in a situation where you don't know what is going to happen with your meals.
On syringe therapy you will notice that even if you are counting carbs and you eat exactly the same number of carbs for days in a row at a certain meal, your blood sugars are never the same for a few hours after the meal. Without getting into the specifics of it all, it generally has to do with something called the glycemic index, protein levels, as well as fat content in different foods.
First, a couple definitions to start with. An insulin pump will deliver insulin to you 24 hours a day (generally at 5, 10, or 15 min. intervals), and this is called a "basal" amount of insulin. This acts as the more traditional "long acting" insulin in syringe therapy. Then for meals (or times when you find yourself with a high blood sugar) you will give yourself a "bolus", or a spike of insulin to counteract the increase in sugar levels in your blood. There are times that you will change your basal rate of insulin delivery, but that is for another blog post. Today, I am looking at what you can do with your bolus.
Your diabetes educator will go over with you how to establish how much insulin to give yourself for the number of carbohydrates you are eating, or how to counteract a high blood sugar. What I will look at here is what options your pump will have to use the insulin bolus.
Your insulin pump will generally give you three options for doing your bolus:
1. Normal/standard bolus: This type of bolus is the one that will be used most by beginner insulin pumpers. This is equivalent to giving yourself an injection of fast acting insulin. The entire amount of insulin will get to your blood stream in the fastest possible time. Honestly, I default to this most of the time, myself, because it is easiest. However, for people who are better in control and more fully understand the nutrition associated with various foods, this bolus will only be used for meals that are both low in proteins and low in fat.
2. Square-wave/extended bolus: This type of bolus will take the amount of insulin you wish to give yourself and evenly distribute the bolus over a certain time frame (again, something you control, and can be anywhere from 30 min. to a few hours). This bolus setting is more used by advanced users, again. You would use this setting if you were eating a high protein and high fat meal (like a steak or turkey and gravy). Given that this type of meal would give a slow but steady increase of blood sugar levels, this square-wave bolus tries to match the insulin delivery with the sugar delivery to the blood stream. The timing of how long to set the bolus for is best discussed with your diabetes educator and nutritionist. This is also ideal if you are at a party and know that you are going to be eating a little bit all the time, but not really settling down for a full and proper meal.
3. Dual-wave/combination bolus: This type of bolus is exactly what it seems, a combination of the first two types discussed. Again, this is used by an more advanced user of their insulin pump. It is used in a couple different scenarios. If you have a high blood sugar before doing the bolus, your pump will not allow you to simply do a "square-wave". It will tell you that you must do some sort of insulin delivery immediately (to bring your blood sugar back in line with normal), and then will follow with the remainder of the square wave. It is also used if you are eating a high carb high fat meal (like pizza, chocolate cake, or pasta with a heavy cream sauce). You can choose how much insulin will be split between the instant delivery and the remainder goes towards the square-wave for the time period you choose.
These different patterns may seem overwhelming at first, but it just take some practice and work with a nutritionist to understand what foods will have what effect.
Friday 30 March 2012
Monday 26 March 2012
Is an Insulin Pump just like having a pancreas?
To the chagrin of some diabetics using insulin, simply using an insulin pump is not just like having a pancreas. When I started getting information about my conversion to an insulin pump, I had illusions of this sort of thing being available now (well, "then"). I had half-expected my insulin pump to know what my blood sugars are and for it to compensate based on that. That is not the case, but some people/organizations say that this is not something that is too far off.
That statement must be tempered by a few precautions, however. There are organizations working towards creating a "closed loop" system, whereby a CGM (Continuous Glucose Monitor) would transit glucose levels to your insulin pump and your pump would increase or decrease the amount of insulin being pumped into your body. That seems like a relatively easy fix when you look at just that, because there are CGM's out there on the market and they do connect with insulin pumps. However there are other things to think about in that scenario. One item that quickly comes to mind is how the system would correct for things like exercise. Take the case of you taking some extra carbs before going on a run. Currently, your CGM would show you having a higher sugar level and tell the pump to give you more insulin, and when you go on your run, you now have the insulin and the exercise "taking care of" the additional carbs in your system. Therefore, a system that solely gives you insulin will never (in my mind.....non-expert, as it is) be able to be totally self-sufficient in functioning as an "artificial pancreas".
That leads to another precaution that comes to mind. A pancreas' function is not solely to create insulin. A pancreas also produces amylin (slows the digestion and the rate of glucose entering the blood stream) and glucagon (raising blood sugar). For a fully functioning "artificial pancreas" you would need this system to be also able to at least give you both insulin and glucagon, in my opinion. In a pump form, that would require at least three probes inside your body (1: the CGM; 2: the insulin cannula; 3: the glucagon cannula).
One more precaution to consider is that current CGM's (at least any I know of) only test the interstitial fluid (the dumbed down definition of which is the fluid found just under the skin) which only shows what the blood glucose levels are after a delay (studies differ on what this delay is, ranging from 5 - 20 minutes). In periods of relatively static blood glucose levels, that is not too much of a problem, but in times of sharp increases or decreases, those minutes can be very important, if you are only using the CGM as a measure of blood sugars (something you can't do).
Having said all this, there are studies currently underway in Europe and North America (FDA recently allowed for some tests in relation to an artificial pancreas) to create something that would function as an artificial pancreas. Advances are occurring all the time, and the "construction" of an artificial pancreas I have just discussed is only one way it is being looked at. I'll leave it others to come up with how to build it, but being able to have one in my lifetime would be amazing!
Monday 19 March 2012
Changing your infusion set
Note: for those of you who are new to the "insulin pump game" and are not sure what some of the terms are that I am using, please see a previous post of mine.
For those of you who have lived with your insulin pump for quite a time you know this procedure all too well. For those of you looking at getting an insulin pump what follows is a description as to what you will be doing every third day (at the most). This is an extremely long post, however it will take longer to read it than it actually takes you to change your infusion set...just being thorough! (Once again, remember I am NOT giving this as professional advice, but just my personal experience. Nothing I say should circumvent what your diabetes educator will tell you....I am just giving you an idea of what it is like.)
What you need:
- insulin pump
- insulin (a rapid acting one)
- reservoir
- tubing (unless you have a tubeless pump)
- infusion set
- alcohol swab
- Polysporin (or some other antibiotic cream) - optional
- band-aid - optional
- cannula inserter - optional
I use a Medtronic MiniMed pump with a Silhouette infusion set. Therefore my post will have details about this, but all insulin pumps will have similar steps.
The recommendation is that you change your infusion set every third day, and if you are lucky, that will coincide nicely with the amount of insulin your reservoir can hold, so you are changing everything at the same time. One needle every third day is a heck of a lot nicer than up to 12 or more injections over three days on a traditional syringe treatment.
1. The first thing I have to do is take off the the infusion set that is on/in me. In the picture you will see that I can unhook the tubing from the infusion set.

At this point I now have to take the infusion set out of my stomach (my preferred location). While the set is attached to me with an adhesive, it fortunately does not leave a sticky residue. When I peel the infusion set off, it pulls the plastic cannula out as well. Extremely rarely will there be any blood. (Of course the first time I tried it with my nurse educator, I bled for a few minutes! Talk about a bad start!) To reduce scarring, I use a dab of Polysporin before covering it with a band-aid. The cannula goes in the garbage.
2. I then have to remove my reservoir from my insulin pump, which is done with a simple twist and another twist to get the tubing off of the reservoir. At this point I also have to "rewind" my pump, so the plunger that pushes the insulin out of the reservoir rewinds back into the pump (this is done with a couple quick button presses on my pump).
3. I am now ready to start from scratch and get the new supplies ready to go. I start by getting my reservoir full of insulin. In the picture below you will see the reservoir as it comes out of the box. It has top, middle, and bottom sections. The top (blue) attaches to your vial of insulin. The bottom is how you pull back the rubber section inside the reservoir that holds the insulin. The middle section is the reservoir itself, which goes into your insulin pump when it is filled with insulin.

You should pull back and forth (while twisting) on the bottom part so that the lubricant on the rubber inside the reservoir can loosen up. Apparently it helps so that there is less pressure on your insulin pump to do the work, which could burn the motor over the course of a few years.
4. Before attaching the blue part to the insulin vial I like to pull back air into the reservoir to push into the insulin vial (much like with traditional syringes, to maintain air pressure inside the vial). While the blue part is a "venting cap", I find it much easier to push air into the vial myself. You then simply pull back slowly on the bottom of the reservoir to pull back insulin into the reservoir, ensuring to keep it vertical, so all bubbles go to the top. You then may have to go back and forth a few times (possibly tap on the reservoir a little) to get all the bubbles out.
5. When the reservoir is full of insulin (no air), you can turn the vial right-side-up, and twist the reservoir off of the blue part (venting cap). The bottom part of the reservoir also twists off of the reservoir itself.
6. At this point you can attach the tubing to the reservoir (where the venting cap was) with another simply twist. You can also insert the reservoir into the insulin pump and twist it into a locked position.
7. Now you need to get your cannula inside you. There are a number of infusion sites to choose from. You can do it pretty much anywhere you used to inject insulin with a syringe, including your upper arms, thighs, upper buttocks, or your abdomen (my favorite). If you choose to always put the cannula into the same area (i.e. only the abdomen) ensure you rotate around the area so that you do not get a build up of scar tissue, which will adversely affect your insulin absorption.
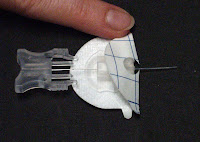
8. Once you have chosen your site, clean the area with your alcohol swab. Let it dry for a few seconds. You can then load your cannula inserter, if you wish to use it. As I noted in a previous post, I tried it a few times and do not like it. I find it much easier to insert the cannula manually, although the inserter (which is basically a spring load device that shoots the cannula into you, much like your finger pricking device) can help getting to harder to reach areas. The cannula (which is the flexible teflon tube that sits inside you) is shown on the left. On the right, you will see how I get the cannula out of the box. It has a needle inside the cannula and has the adhesive around it (the plastic you see in this picture is actually a protective tube that you must remove...it is so you don't prick yourself by accident!).


There are generally two backings to remove from the adhesive, one of which you take off before putting the needle into you (see the picture below to see the raised part of the adhesive which is removed first). Despite my preliminary reservations, the needle with the cannula around it, goes into your body just as smoothly as a regular injection (seriously). You can then ensure the exposed adhesive is applied evenly to your skin. At that point you just have to pinch the two sides of the grey plastic part in the picture on the right and pull the needle out. That leaves the cannula safely inside you. You can then pull off the second backing from the adhesive and ensure the full adhesive is nicely attached to your body.
9. You now have to "prime" your tubing (if you have tubing). Again, with a few clicks on your insulin pump, you will fill the tube with insulin, again so there is no air in there. Next, you affix your tubing to your cannula (see the first picture in step 3.
10. Your final step is to prime the cannula, as that is currently full of air. You simply have to hit one more button on my pump and it pumps in a set amount of insulin, enough to simply fill the cannula with insulin (this amount you will find in your cannula instructions.
Really long post, but it is really a quick process!
For those of you who have lived with your insulin pump for quite a time you know this procedure all too well. For those of you looking at getting an insulin pump what follows is a description as to what you will be doing every third day (at the most). This is an extremely long post, however it will take longer to read it than it actually takes you to change your infusion set...just being thorough! (Once again, remember I am NOT giving this as professional advice, but just my personal experience. Nothing I say should circumvent what your diabetes educator will tell you....I am just giving you an idea of what it is like.)
What you need:
- insulin pump
- insulin (a rapid acting one)
- reservoir
- tubing (unless you have a tubeless pump)
- infusion set
- alcohol swab
- Polysporin (or some other antibiotic cream) - optional
- band-aid - optional
- cannula inserter - optional
I use a Medtronic MiniMed pump with a Silhouette infusion set. Therefore my post will have details about this, but all insulin pumps will have similar steps.
The recommendation is that you change your infusion set every third day, and if you are lucky, that will coincide nicely with the amount of insulin your reservoir can hold, so you are changing everything at the same time. One needle every third day is a heck of a lot nicer than up to 12 or more injections over three days on a traditional syringe treatment.
1. The first thing I have to do is take off the the infusion set that is on/in me. In the picture you will see that I can unhook the tubing from the infusion set.

At this point I now have to take the infusion set out of my stomach (my preferred location). While the set is attached to me with an adhesive, it fortunately does not leave a sticky residue. When I peel the infusion set off, it pulls the plastic cannula out as well. Extremely rarely will there be any blood. (Of course the first time I tried it with my nurse educator, I bled for a few minutes! Talk about a bad start!) To reduce scarring, I use a dab of Polysporin before covering it with a band-aid. The cannula goes in the garbage.
2. I then have to remove my reservoir from my insulin pump, which is done with a simple twist and another twist to get the tubing off of the reservoir. At this point I also have to "rewind" my pump, so the plunger that pushes the insulin out of the reservoir rewinds back into the pump (this is done with a couple quick button presses on my pump).
3. I am now ready to start from scratch and get the new supplies ready to go. I start by getting my reservoir full of insulin. In the picture below you will see the reservoir as it comes out of the box. It has top, middle, and bottom sections. The top (blue) attaches to your vial of insulin. The bottom is how you pull back the rubber section inside the reservoir that holds the insulin. The middle section is the reservoir itself, which goes into your insulin pump when it is filled with insulin.
You should pull back and forth (while twisting) on the bottom part so that the lubricant on the rubber inside the reservoir can loosen up. Apparently it helps so that there is less pressure on your insulin pump to do the work, which could burn the motor over the course of a few years.
4. Before attaching the blue part to the insulin vial I like to pull back air into the reservoir to push into the insulin vial (much like with traditional syringes, to maintain air pressure inside the vial). While the blue part is a "venting cap", I find it much easier to push air into the vial myself. You then simply pull back slowly on the bottom of the reservoir to pull back insulin into the reservoir, ensuring to keep it vertical, so all bubbles go to the top. You then may have to go back and forth a few times (possibly tap on the reservoir a little) to get all the bubbles out.
5. When the reservoir is full of insulin (no air), you can turn the vial right-side-up, and twist the reservoir off of the blue part (venting cap). The bottom part of the reservoir also twists off of the reservoir itself.
6. At this point you can attach the tubing to the reservoir (where the venting cap was) with another simply twist. You can also insert the reservoir into the insulin pump and twist it into a locked position.
7. Now you need to get your cannula inside you. There are a number of infusion sites to choose from. You can do it pretty much anywhere you used to inject insulin with a syringe, including your upper arms, thighs, upper buttocks, or your abdomen (my favorite). If you choose to always put the cannula into the same area (i.e. only the abdomen) ensure you rotate around the area so that you do not get a build up of scar tissue, which will adversely affect your insulin absorption.
8. Once you have chosen your site, clean the area with your alcohol swab. Let it dry for a few seconds. You can then load your cannula inserter, if you wish to use it. As I noted in a previous post, I tried it a few times and do not like it. I find it much easier to insert the cannula manually, although the inserter (which is basically a spring load device that shoots the cannula into you, much like your finger pricking device) can help getting to harder to reach areas. The cannula (which is the flexible teflon tube that sits inside you) is shown on the left. On the right, you will see how I get the cannula out of the box. It has a needle inside the cannula and has the adhesive around it (the plastic you see in this picture is actually a protective tube that you must remove...it is so you don't prick yourself by accident!).

There are generally two backings to remove from the adhesive, one of which you take off before putting the needle into you (see the picture below to see the raised part of the adhesive which is removed first). Despite my preliminary reservations, the needle with the cannula around it, goes into your body just as smoothly as a regular injection (seriously). You can then ensure the exposed adhesive is applied evenly to your skin. At that point you just have to pinch the two sides of the grey plastic part in the picture on the right and pull the needle out. That leaves the cannula safely inside you. You can then pull off the second backing from the adhesive and ensure the full adhesive is nicely attached to your body.

9. You now have to "prime" your tubing (if you have tubing). Again, with a few clicks on your insulin pump, you will fill the tube with insulin, again so there is no air in there. Next, you affix your tubing to your cannula (see the first picture in step 3.
10. Your final step is to prime the cannula, as that is currently full of air. You simply have to hit one more button on my pump and it pumps in a set amount of insulin, enough to simply fill the cannula with insulin (this amount you will find in your cannula instructions.
Really long post, but it is really a quick process!
Tuesday 13 March 2012
Sleeping with an insulin pump
Everyone sleeps differently....some people on their stomach, some on their back, some (like my little son) seem to travel all over the bed at night, some on their side, and some like to sleep on their spouse's side....of the bed!
This was one thing that I questioned when I started considering use of my pump. I was told to just slip it into a pocket in my pyjamas. That sounded easy enough, and I felt silly for questioning where I would put it. (One thing I have learned is that there are no silly questions.) Most of my pyjamas have pockets so I felt pretty good about it that my pump would not be an issue while sleeping. As everything else in life, it wasn't quite that simple. I have not had one night where my insulin pump has stayed in my pyjamas pocket the whole night.
So what happens? I cannot tell you how many times I have awoken in the middle of the night with my insulin pump in the middle of my back. I am generally a back sleeper, and I cannot figure out how my insulin pump crawls out of the depths of my pocket and out onto the bed sheets and somehow decides it can lift my not-so-light-frame up and settle into the small of my back. Sometimes I move it out and put it back beside me, or if I am too tired I just leave it there until morning.
There must be a way to stop that from happening, right? There are a few options, some I have thought of, some I have tried, and others that just won't fit my sleeping patterns I am sure:
- you could sew a button into your pyjamas (like a shirt button): if it is strategically placed, I am sure it could keep your pump securely in your pocket. I haven't actually tried this yet, as I have yet to convince my wife to sew a button on there for me. :)
- you could wear a pouch: I have a cloth pouch attached to a soft cloth belt that I can wear that keeps the insulin pump in place. This pouch can be worn during the day or at night. The problem I found with the velcro belt is that during the night when I move around I must move the velcro ever so slightly so as to bug and scratch me.
- I have heard of other people with long enough tubing that they are able to leave their insulin pump on their night-side table. It may work for you, but not for me...I move around too much at night.
So, I continue to let my insulin pump fall out of my pocket every night. I know that I have to look for it when I get out of bed in the morning and stuff it back in there.
Is it a hassle? Yes.
Do I care that I have that hassle? No.
Why? I have never had the pump hurt me while I am sleeping (I have never had it hit me or my wife in the head!) and the control over my blood sugars trumps any teeny tiny minor hassle like this.
Do you have any other suggestions?
Friday 9 March 2012
Insulin Pump dictionary
It comes to mind that I am talking about an insulin pump using words that not everyone may understand...especially if you don't have an insulin pump and are just considering one.
Basal rate: the amount of insulin required throughout the day (acts like your "long lasting" insulins under a traditional syringe based insulin regime. With most insulin pumps, you have a variety of basal rates that you can program for different times of the day, allowing for more personalized insulin delivery than the "long lasting" insulins.
Bolus: this in the amount of insulin that your insulin pump gives yo, usually when you are eating a meal. Based on carbohydrate counting, and a "wizard" installed on most insulin pumps, your insulin pump figures out how much insulin is required, down to the tenths or even hundredths of a unit!
Cannula: a thin tube that sits under your skin, held in place held in place with an adhesive. The cannula has a opening to which you attach the tubing that runs to your insulin pump. This can be angled or be at a 90-degree angle. The cannula is inserted subcutaneously with a needle inside the cannula....the needle is then pulled out, leaving the cannula firmly in place.
Extended Bolus: a feature included in most insulin pumps allowing you to bolus over a certain amount of time. This is helpful in situations like when you are eating over a period of time, having a high fat meal, or consuming a very large meal. An extended bolus can give an even amount of insulin over the time programmed ("square-wave") or give a larger dose initially followed by a lower steady dose ("dual-wave").
Infusion set: the adhesive patch that holds your cannula in place on your skin.
Insulin On Board (IOB): a calculation usually viewable on your insulin pump that shows you how much insulin is still active in your body (your diabetic educator will help you set this up).
Priming: the process of setting up your insulin pump every third day (at the most) to let the pump accept another reservoir and fill the new tubing set with insulin.
Reservoir: a small container in which you fill with enough insulin to last you up to three days. This reservoir is placed inside the insulin pump and the insulin is pushed up into the tubing, and into your body through a cannula.
Subcutaneous: just under the skin.
I hope this helps in your understanding of different insulin pump terminology.
Tuesday 6 March 2012
Traveling with your insulin pump
Do you need to worry about anything when traveling with your insulin pump....particularly air travel? No, in my mind, there is absolutely no issue traveling with your insulin pump.
With my insulin pump I have flown domestically within Canada, to Hong Kong, to Indonesia, and domestically within Indonesia. I have never, ever, had a problem with my insulin pump, but that doesn't mean I wasn't prepared for a variety of eventualities.
Pre-flight:
1. for any flight, domestic or international, you want to ensure you have a fairly fresh vial of insulin in your insulin pump. The last thing you want to do is have to try to change your infusion set while you are either in the cramped confines of your seat.....or in the toilet!
2. For any trip, it is also a good idea to make sure you have packed extra vials of insulin, as well as syringes (or "pens" for injecting), as you don't want to be away from home and have your insulin pump break or get lost and you have no recourse for supplying insulin to yourself. Remember, that not only will you have to bring your rapid-acting insulin, but also a long-acting insulin (like an NPH or Lantis). Your diabetes educator or doctor can help you decide what you proper doses would be in that eventuality. I generally pack some in my hand luggage, as well some spare in my suitcase, in case I lose one.
3. While I have never been asked for one, I have a letter that was supplied from my doctor indicating that I am a type 1 diabetic and need to bring with me insulin supplies, which could include syringes, testing supplies, infusion sets, and insulin. I think it is a good idea, because bringing sharps on a plane can always be viewed as suspicious. As I said, though, I have never had to produce this letter to authorities.
At the airport security check:
4. Of course you have to pull out your liquids on flights now, which will include your vials of insulin. Ensure the prescription labels have the same name as that as is on your boarding pass. There is no need to pull out your insulin pump supplies or other syringes. Those will show up on the x-ray, and if they want to pull the supplies out, they will.
5. Going through the body scanner will have absolutely no effect on your insulin pump or the insulin inside it. I have actually been behind people in line who have had an insulin pump on and have taken it off would not put it through the scanner, insisting on a visual scan. There is honestly no need for that, and I think it causes more issues than not. The people I have seen who would not have their pump scanned, had their whole bags searched. I simply walk through the scanner with my insulin pump in my hand, showing it off to the officers. Every time, I have been asked if it is an insulin pump, to which I have said yes. I have never had to say what it was, even flying domestically within Asia. For those of you who generally keep your pump in a harder to get to area (to hide it more from plain sight), I would recommend for that flight to keep it in an easily accessible place, so that it doesn't look like you are hiding something....especially if you get patted down for some reason, and they find something under your clothes with a "wire" attached to it.
In Flight;
6. I like to keep my date and time settings the same as my place of departure. This more refers to when you will be crossing multiple timezones. As with any good diabetic, ensure you have an ample supply of food that you can eat, in case the meals in-flight do not coincide with your needs. I also like to test my blood sugar every 2 to 4 hours of flying time, just to make sure everything is still good.
At your destination:
7. I always change my date and time settings to my destination immediately, and also test my blood sugar every couple hours after the change. Depending on what insulin doses your received and what you will be getting, you may have to adjust (bolus higher, or temporarily reduce some basal) your doses.
A long-winded response, but it all comes down to say, you don't have to worry about traveling with your insulin pump. See your diabetes educator for a complete list of what you should take on vacation or what you may need, but have no fear about bringing your insulin pump through airport security or on the plane.
Friday 2 March 2012
Is it going to feel like I'm "on a leash"?
One concern people may have about switching to an insulin pump is the feeling that they are effectively feeling like they are being "tied to a leash". There is the thought that there is always this "thing" attached to them that they have to take care of, making them feel trapped. There is also a perception that the insulin pump is going to be an unsightly look as it is always attached to you. These fears are common, but quite unnecessary.
Let's face it, being diagnosed with Type 1 diabetes is always going to make you feel like you are tied to something. You have to always make sure you have your glucose monitor, you have to make sure you monitor your food intake, you have to make sure you carry your insulin around with you.
Your insulin pump actually gives you freedom in some respects. First of all, your insulin pump is going to carry your insulin for you, so you are not going to forget to bring your insulin and syringe with you when you go off to school, work, or out for the day. Next, you no longer have to pull your syringe and insulin bottle out in the middle of class, at your desk, or sneak off to the bathroom to give yourself any insulin. Once you are familiar with using your insulin pump, you could use the advanced features of your pump and simply keep your conversation going over lunch with your friends and let simply give yourself the proper amount of insulin without even looking at your pump. The pump also allows you to eat what you want, when you want, and as long as you count your carbs properly, you will always be "injected" with the right amount of insulin.
As far as the "unsightliness" is concerned, your insulin pump will be as noticeable or unnoticeable as you want it to be. There are a number of different pumps on the market (speak to your diabetes educator about the best one for you) but you can get pumps that come with tubing (to run from the insulin pump to the insertion site) or ones that basically sit right against your skin, therefore eliminating the tubing. The tubeless pumps would allow you to have the pump sit right against your skin, and would be covered by clothing all the time, so you would not really be "advertising" that you have a pump. Personally, I have a pump with tubing, and I use the longest tubing available as I prefer to have my pump in the same place (on my right side on my best or in my pocket) all the time. The longer tubing allows me to have injection site all around my abdomen without having to move my pump. I could have the ability, if I so wished, to have my pump hidden in my pocket with the tubing totally under my shirt and pants, by cutting a small slit in my pocket allowing the tubing to be in my pocket without being seen by the outside world. I don't actually do this, though, as I do not mind having a small bit of tubing show coming out of my shirt going to my belt loop. I have never received an odd look from anyone, in fact some people have been surprised when I actually showed them the pump and asked "How did I NOT see that?!).
If you are worried about being "leashed" to a pump either physically or metaphorically, you can't let that stop you from using an insulin pump. As I said, it frees you up with respect to not having to carry some of your supplies around with you. Additionally, there are many ways and places you can hide your insulin pump, if you are self-conscious about wearing one. However, in this day of everyone wearing their mp3 player or phone on them somewhere, you really won't stand out. I know from experience.
Subscribe to:
Posts (Atom)